Wednesday, March 11, 2009

Drawing a Rosette


Building the Rosette


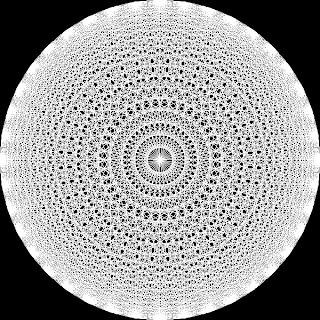
Above is a picture of a rosette with 40 points. To make a rosette, create a set of equidistant points around a circle and then connect every point to every other point.

Candidate Points


First, we need to compute the rosette points by making points equally spaced around a circle.

struct GLFloatPoint{GLfloat x, y;};

// Compute the candidate points, by equally
// spacing them around a circle.
GLFloatPoint* points = new GLFloatPoint[numPoints];
float angleStep = (3.14159f * 2.0f / numPoints);
float currentAngle = 0.0f;
for(unsigned int i=0; i<numPoints; i++)
{
points[i].x = radius*cos(currentAngle);
points[i].y = radius*sin(currentAngle);

currentAngle += angleStep;
}

Connecting Points


If you connect every point to every other one, you end up with duplicate edges between vertices.

How do you get not create duplicate edges in the simplest possible way? Once you connect a certain point to all others, keep it out of the list of points to connect to. This can be done using two loops. The outer loop tracks the vertex we are connecting from, and in the inner loop tracks the vertex to which we are connecting.

unsigned int index = 0;
// The vertex we are connecting from.
for(unsigned int j=0; j<numPoints; j++)
{
// Connect to all other points.
// Lines have an origin and end point.
for(unsigned int k=j+1; k<numPoints; k++)
{
rosettePoints[index].x = points[j].x;
rosettePoints[index].y = points[j].y;
index++;
rosettePoints[index].x = points[k].x;
rosettePoints[index].y = points[k].y;
index++;
}
}


Drawing


Vertex Arrays


Using vertex arrays, we can build the entire rosette at startup, and then can send all the vertices to be drawn at once. Using an array of GLFloatPoint, causes the x's and y's in the structs to align in memory just as if they had been put into an array of GLfloat.

Conceptually,

/* Structs */
GLFloatPoint A, B, C;
GLFloatPoint pointArray[] = {A, B, C}
/* Manually */
GLfloat floatArray[] = {A.x,A.y,
B.x,B.y, C.x,C.y}

// You need to cast the pointers for this to work,
// but this is why I miss pointers in Java/Ruby.
GLFloatPoint* pointPtr = (GLFloatPoint*)floatArray;
pointPtr[0].x = // A.x
pointPtr[0].y = // A.y
pointPtr[1].x = // B.x

GLfloat* floatPtr = (GLfloat*)pointArray;
floatPtr[0] = // A.x
floatPtr[1] = // A.y
floatPtr[2] = // B.x
floatPtr[3] = // B.y


Struct Pointer Magic


In short, we can merrily use the array of GLFloatPoint in place of a big array of floats. This makes it easier to figure out where you are in the array quickly, since incrementing a GLFloatPoint* in a loop will move you forward one point. Also, you can use array notation, point[10], for the 11'th point, for instance.


// Allow us to use vertex arrays
glEnableClientState(GL_VERTEX_ARRAY);

// Set the array of points to use
glVertexPointer(2, GL_FLOAT, 0, rosettePoints);

// Render lines from the array vertices.
// rosetteSize = (numPoints-1)*numPoints/2*2.
// This comes from connecting every point to
// every other point without duplicates.
// The "*2" comes from two vertices per line.
glDrawArrays(GL_LINES, 0, rosetteSize);

Thursday, March 5, 2009

Disk Visualization

The Linux tool Baobab uses a few normally unorthodox methods to show disk usage. It uses a radial space filling tree as a main view, and also a tree map. Let's see how these concepts are applied.

Radial Space Filling Tree


A simple way of figuring out graphically the disk usage of my /usr directory.

This is similar to the color wheel except with no spacing between sections. The top folder is the center section, and each ring sector away from the center is one directory down into the tree. Each ring is divided into sections representing each folder belonging to the parent sector.

The visualization is powerful because it shows how children directories sprout off of the parent directories. Also, the scale of the children in the grand scheme makes sense since it is constrained within the angular bounds of the parent sector.

In this example:

/usr/ (center)
share/ (first ring, highlighted sector)
doc/ (second ring, dark red sector on the right)


The size of the ring section indicates how much disk is dedicated to that folder. /usr/share is about half the first ring, so it contains about half of all disk usage of the folder /usr.

Treemap


The treemap version. From left to right: /usr/share (blue), /usr/lib (olive), /usr/src (brown), /usr/bin (lime), etc.

Either visualization shows rather easily that my /usr/share directory is the cause for the size of the /usr directory.

Monday, March 2, 2009

Ruby Vector2D

A 2D Vector for Ruby. This is for the Koch snowflake and future 2D examples. Feel free to let me know how I can improve it, or where I can find a good third-party implementation.

Writing geometry classes has been one of my biggest frustrations because of the different implementations, or lack thereof, in the various graphics packages. As a result of this, my first instinct when picking up a new framework is figuring out what geometry is supported and the operations that are available.

A good geometry class for points, vectors, lines, shapes, etc., can save you a lot of headache trying to remember how to do a certain geometrical operation, and focus instead on putting these operations together.


# Use this so glVertex works.
require 'opengl'

class Vector
attr_accessor :x, :y;

def initialize(x,y)
self.x = x
self.y = y
end

def gl_vertex
GL::Vertex2f(x,y)
end

def normal
Vector.new(-@y,@x)
end

def normalize
before_length = length
return if before_length == 0
@x /= before_length
@y /= before_length
end

def length
return Math.sqrt(@x*@x + @y*@y)
end

def reverse
@x = -@x
@y = -@y
end

def add_vector(v)
@x += v.x
@y += v.y
end

def sub_vector(v)
@x -= v.x
@y -= v.y
end

def multiply(scalar)
@x *= scalar
@y *= scalar
end

def divide(scalar)
@x = @x / (1.0 * scalar)
@y = @y / (1.0 * scalar)
end

def Vector.copy(p)
return Vector.new(p.x,p.y)
end

def Vector.between(p1,p2)
between = Vector.new(p2.x,p2.y)
between.sub_vector(p1)
return between
end

def to_s
"#{x}, #{y}"
end

def Vector.midpoint(p1, p2)
midpoint = Vector.new(p1.x,p1.y)
midpoint.add_vector(p2)
midpoint.divide(2.0)
return midpoint
end
end

Koch Snowflake


What is is?

Wolfram's Koch Snowflake.

The Recipe

  1. Take a line.
  2. Divide into three parts.
  3. Take the middle part and create an equilateral triangle bump from it.
  4. Repeat steps using each of the lines from the new shape.

Visually

To make the Koch snowflake, you start with three lines that make an equilateral triangle.


Ruby Version


# A vector implementation I made
require 'vector.rb'

class Koch
# Creates a Koch line from point p1 to point p2
def initialize(p1,p2)
@points = [p1,p2]
end


# Creates the next step in the fractal
def step
p1 = @points.shift
new_array = [p1]

# For all points in the shape,
# divide the line from next p1
# to next p2.
while(@points.length > 0)
p2 = @points.shift

third = Vector.between(p1,p2)
third.multiply(0.333)
two_third = Vector.between(p1,p2)
two_third.multiply(0.666)

# Adds p1 to the delta between p1 and p2 to
# get the actual 1/3 and 2/3 way points.
third.add_vector(p1)
two_third.add_vector(p1)

# Creates bump roughly equivalent to an equilateral triangle
# This is the key line here: the midpoint is moved along the normal
# (perpendicular line) of the line. If you do Vector.between(two_third,third)
# the normal points the opposite way and the bump will be backwards.
top = Vector.midpoint(third,two_third)
top.add_vector(Vector.between(third,two_third).normal)

# Adds the subdivisions into the point array.
new_array << third << top << two_third << p2

# Moves to the next point
p1 = p2
end

@points = new_array
end


def gl_paint
GL.Begin(GL::LINE_STRIP)
for p in @points
GL.Vertex2f(p.x,p.y)
end
GL.End
end
end