Friday, November 13, 2009

Bezier Curves


What Curves?

Bezier curves. We'll take the formal mathematical approach to this problem.
  1. Take n+1 control points.
  2. The curve will start at the first control point and end at the last control point.
  3. Iterate between t = 0 and t = 1 for small steps of t for curve points and connect the points:
    Curve point(t) = Sum each point multiplied by the Bernstein polynomial for "n choose i" evaluated at t.
Note: For example, the Bernstein polynomial for the second (i = 1) of four points (n = 3) would be the Bernstein polynomial for 3 choose 1, which is 3(1-t)t^2.


Implementation


For my implementation, I created a BernsteinPolynomial class, which objects are instantiated for a given (i,n) pair. A call can be made to evaluate the polynomial at a given t value. Be careful, with this approach you need to regenerate all the polynomials every time you change the number of control points.


public class BernsteinPolynomial {
    private int mBinomialCoefficient;
    private int mI, mN;

    public BernsteinPolynomial(int i, int n) {
        // Sanity checks
        assert (n >= 0);
        assert (i >= 0);

        if (n < 0 || i < 0) {
            throw new Error("Cannot create Bernstein polynomial for " + i + ','
                    + " and " + n + '.');
        }

        // Setup object
        mI = i;
        mN = n;
        mBinomialCoefficient = Combinatorics.binomialCoefficient(mN, mI);
    }

    public String toString() {
        return "(" + mBinomialCoefficient + ") " + ((mI == 0) ? "" : "t^" + mI)
                + "(1-t)^(" + (mN-mI)+")";
    }

    /**
     * Evaluate this at the given t value.
     */
    public double evaluate(double t) {
        double oneMinusT = 1.0 - t;

        // Bn(t) = (n choose i)*(t to the i)*(1 - t to the n-i)
        return mBinomialCoefficient * Math.pow(t, mI)
                * Math.pow(oneMinusT, mN - mI);
    }
}


Writing the "n choose i" shows a useful case of recursion.


public class Combinatorics {

    public static int factorial(int i) {
        assert(i >= 0);
        if (i == 0 || i == 1)
            return 1;
        else
            return i * factorial(i - 1);
    }

    public static int binomialCoefficient(int n, int k) {
        return factorial(n) / factorial(k) / factorial(n - k);
    }
}


Encapsulation


A BezierCurve encapulasates this so we can change to a recursive implementation of the drawing without messing with our clients. It also handles caching between drawings so we don't need to recalculate every time we draw.

Monday, October 26, 2009

Fractals


Been messing around with fractals lately. Pickover's book has been my starting point for the time being.

Sunday, July 26, 2009

Lessons learned from IPod Development

A timeline with a new library and language


Learning a language like Objective-C and the iPhone SDK is very time consuming. Doing this at the same time where a professor is expecting you to produce a vague product (read: no concrete requirements), and expect to be confused. That's not to say it wasn't a very effective learning experience.

Challenges


Learning a library and developing a product at the same time is not an efficient process. Your designs are colored by your understanding of the previous libraries and languages you have worked with--not the current one you need to develop with.

This boils down into two categories of challenges:

Identifying constraints


What can the library not do? Is there functionality from other libraries I would use and isn't available from the current library? What alternatives are there with the library I'm using now?

Identifying capabilities


What things can the library make easier for me? These are much harder to discover as they lurk in hundreds of html docs or deep in information-light tutorials. Ofter there are constraints which are only imaginary because the library offers the functionality you want, you just don't know about it yet.

Inaccurate (Imaginary) Constraints and Capabilities


Working in an unfamiliar language with an unfamiliar library easily lends itself to inaccurate assessments of the tool's constraints or capabilities. There might not even be an analogous construct, such as moving from Python to C and expecting duck typing. The tool might offer new constructs to use such as going from C++ to Ruby and not knowing about mixins, an example of inaccurate constraints.

Since the cost of changes in software grows exponentially as the project progresses, continuing under flawed assumptions of constraints and capabilities often makes it cheaper in time and effort to redesign and rebuild from scratch.

Conclusions


Know when to start over and redesign


This is may be the more painful of the two lessons. Abandoning a program and retooling it from scratch is a hard prospect when facing approaching deadlines. This can be important to realize during design and further emphasize the need for clearly defined subsystems and packages and components with minimal interdependencies as a levee against cascading changes in a redesign.

Abstractions and a levelizable design will act as firebreaks when you rip out part of the system after finding several capabilities you didn't know the library had.

Writing for a new library is liberating when you expect to throw your code away, but don't get careless. Rewriting something is a lot easier when it is hidden behind an abstraction and the fewer dependencies on a component means less code to change if that component gets modified significantly.

Rewrite may not mean "full rewrite" if you watch and reduce the number of places you're depending on that new library. Of course you're sunk if the new tool is a new language.

Learn your environment


Learning about the environment is especially important if you are to make a product out of it quickly from management. You should treat the task of learning about your environment as requirements analysis for the NEXT iteration of th eprogram. This goes back to the previous conclusion, that you should expect to do a redesign.

Trying out things in a test (or sandbox, whatever term you prefer) is especially important to learn how to apply new concepts in the domain. Using a separate project for this work is key so you don't screw up prototype code with experimentation. To a certain extent the current prototype is experimentation code, but it is something to show your boss and should be treated as production-level code.

The faster you learn the capabilities of the new tool, the fewer redesigns you will need to do because of a lack of understanding about the project's domain. As your progress there will be less work needed to identify constraints and capabilities of the new tool. It is suggested that you spend much more time in the beginning doing many small sandbox projects to learn about various aspects of the environment, before you begin any project level code.

More work on the front end of the project in sandbox work means less program guts to destroy and better assumptions when work starts on the real program. If a task is annoying or common to deal with, you might be operating under undiscovered capabilities of the tool.

Wednesday, March 11, 2009

Drawing a Rosette


Building the Rosette


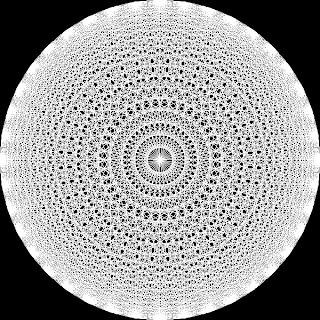
Above is a picture of a rosette with 40 points. To make a rosette, create a set of equidistant points around a circle and then connect every point to every other point.

Candidate Points


First, we need to compute the rosette points by making points equally spaced around a circle.

struct GLFloatPoint{GLfloat x, y;};

// Compute the candidate points, by equally
// spacing them around a circle.
GLFloatPoint* points = new GLFloatPoint[numPoints];
float angleStep = (3.14159f * 2.0f / numPoints);
float currentAngle = 0.0f;
for(unsigned int i=0; i<numPoints; i++)
{
points[i].x = radius*cos(currentAngle);
points[i].y = radius*sin(currentAngle);

currentAngle += angleStep;
}

Connecting Points


If you connect every point to every other one, you end up with duplicate edges between vertices.

How do you get not create duplicate edges in the simplest possible way? Once you connect a certain point to all others, keep it out of the list of points to connect to. This can be done using two loops. The outer loop tracks the vertex we are connecting from, and in the inner loop tracks the vertex to which we are connecting.

unsigned int index = 0;
// The vertex we are connecting from.
for(unsigned int j=0; j<numPoints; j++)
{
// Connect to all other points.
// Lines have an origin and end point.
for(unsigned int k=j+1; k<numPoints; k++)
{
rosettePoints[index].x = points[j].x;
rosettePoints[index].y = points[j].y;
index++;
rosettePoints[index].x = points[k].x;
rosettePoints[index].y = points[k].y;
index++;
}
}


Drawing


Vertex Arrays


Using vertex arrays, we can build the entire rosette at startup, and then can send all the vertices to be drawn at once. Using an array of GLFloatPoint, causes the x's and y's in the structs to align in memory just as if they had been put into an array of GLfloat.

Conceptually,

/* Structs */
GLFloatPoint A, B, C;
GLFloatPoint pointArray[] = {A, B, C}
/* Manually */
GLfloat floatArray[] = {A.x,A.y,
B.x,B.y, C.x,C.y}

// You need to cast the pointers for this to work,
// but this is why I miss pointers in Java/Ruby.
GLFloatPoint* pointPtr = (GLFloatPoint*)floatArray;
pointPtr[0].x = // A.x
pointPtr[0].y = // A.y
pointPtr[1].x = // B.x

GLfloat* floatPtr = (GLfloat*)pointArray;
floatPtr[0] = // A.x
floatPtr[1] = // A.y
floatPtr[2] = // B.x
floatPtr[3] = // B.y


Struct Pointer Magic


In short, we can merrily use the array of GLFloatPoint in place of a big array of floats. This makes it easier to figure out where you are in the array quickly, since incrementing a GLFloatPoint* in a loop will move you forward one point. Also, you can use array notation, point[10], for the 11'th point, for instance.


// Allow us to use vertex arrays
glEnableClientState(GL_VERTEX_ARRAY);

// Set the array of points to use
glVertexPointer(2, GL_FLOAT, 0, rosettePoints);

// Render lines from the array vertices.
// rosetteSize = (numPoints-1)*numPoints/2*2.
// This comes from connecting every point to
// every other point without duplicates.
// The "*2" comes from two vertices per line.
glDrawArrays(GL_LINES, 0, rosetteSize);

Thursday, March 5, 2009

Disk Visualization

The Linux tool Baobab uses a few normally unorthodox methods to show disk usage. It uses a radial space filling tree as a main view, and also a tree map. Let's see how these concepts are applied.

Radial Space Filling Tree


A simple way of figuring out graphically the disk usage of my /usr directory.

This is similar to the color wheel except with no spacing between sections. The top folder is the center section, and each ring sector away from the center is one directory down into the tree. Each ring is divided into sections representing each folder belonging to the parent sector.

The visualization is powerful because it shows how children directories sprout off of the parent directories. Also, the scale of the children in the grand scheme makes sense since it is constrained within the angular bounds of the parent sector.

In this example:

/usr/ (center)
share/ (first ring, highlighted sector)
doc/ (second ring, dark red sector on the right)


The size of the ring section indicates how much disk is dedicated to that folder. /usr/share is about half the first ring, so it contains about half of all disk usage of the folder /usr.

Treemap


The treemap version. From left to right: /usr/share (blue), /usr/lib (olive), /usr/src (brown), /usr/bin (lime), etc.

Either visualization shows rather easily that my /usr/share directory is the cause for the size of the /usr directory.

Monday, March 2, 2009

Ruby Vector2D

A 2D Vector for Ruby. This is for the Koch snowflake and future 2D examples. Feel free to let me know how I can improve it, or where I can find a good third-party implementation.

Writing geometry classes has been one of my biggest frustrations because of the different implementations, or lack thereof, in the various graphics packages. As a result of this, my first instinct when picking up a new framework is figuring out what geometry is supported and the operations that are available.

A good geometry class for points, vectors, lines, shapes, etc., can save you a lot of headache trying to remember how to do a certain geometrical operation, and focus instead on putting these operations together.


# Use this so glVertex works.
require 'opengl'

class Vector
attr_accessor :x, :y;

def initialize(x,y)
self.x = x
self.y = y
end

def gl_vertex
GL::Vertex2f(x,y)
end

def normal
Vector.new(-@y,@x)
end

def normalize
before_length = length
return if before_length == 0
@x /= before_length
@y /= before_length
end

def length
return Math.sqrt(@x*@x + @y*@y)
end

def reverse
@x = -@x
@y = -@y
end

def add_vector(v)
@x += v.x
@y += v.y
end

def sub_vector(v)
@x -= v.x
@y -= v.y
end

def multiply(scalar)
@x *= scalar
@y *= scalar
end

def divide(scalar)
@x = @x / (1.0 * scalar)
@y = @y / (1.0 * scalar)
end

def Vector.copy(p)
return Vector.new(p.x,p.y)
end

def Vector.between(p1,p2)
between = Vector.new(p2.x,p2.y)
between.sub_vector(p1)
return between
end

def to_s
"#{x}, #{y}"
end

def Vector.midpoint(p1, p2)
midpoint = Vector.new(p1.x,p1.y)
midpoint.add_vector(p2)
midpoint.divide(2.0)
return midpoint
end
end

Koch Snowflake


What is is?

Wolfram's Koch Snowflake.

The Recipe

  1. Take a line.
  2. Divide into three parts.
  3. Take the middle part and create an equilateral triangle bump from it.
  4. Repeat steps using each of the lines from the new shape.

Visually

To make the Koch snowflake, you start with three lines that make an equilateral triangle.


Ruby Version


# A vector implementation I made
require 'vector.rb'

class Koch
# Creates a Koch line from point p1 to point p2
def initialize(p1,p2)
@points = [p1,p2]
end


# Creates the next step in the fractal
def step
p1 = @points.shift
new_array = [p1]

# For all points in the shape,
# divide the line from next p1
# to next p2.
while(@points.length > 0)
p2 = @points.shift

third = Vector.between(p1,p2)
third.multiply(0.333)
two_third = Vector.between(p1,p2)
two_third.multiply(0.666)

# Adds p1 to the delta between p1 and p2 to
# get the actual 1/3 and 2/3 way points.
third.add_vector(p1)
two_third.add_vector(p1)

# Creates bump roughly equivalent to an equilateral triangle
# This is the key line here: the midpoint is moved along the normal
# (perpendicular line) of the line. If you do Vector.between(two_third,third)
# the normal points the opposite way and the bump will be backwards.
top = Vector.midpoint(third,two_third)
top.add_vector(Vector.between(third,two_third).normal)

# Adds the subdivisions into the point array.
new_array << third << top << two_third << p2

# Moves to the next point
p1 = p2
end

@points = new_array
end


def gl_paint
GL.Begin(GL::LINE_STRIP)
for p in @points
GL.Vertex2f(p.x,p.y)
end
GL.End
end
end

Tuesday, February 24, 2009

No more avoiding databases.

Databases are something that I've managed to avoid working with, and are a gaping void in my programming experience. Luckily, for my iPhone project, I've been told they want a database of every event stored. Databases cannot be avoided anymore, I guess.

I found the SQLiteBooks Example for the iPhone and an excellent collection of tutorials for the iPhone SDK in general. Up until this point, my main sources of help have been the example code and documentation sources from Apple. Expanding my pool of help resources is going to let me learn a lot more a lot quicker.

After looking through the SQLiteBooks code, and looking up every sqlite3 call it makes, the clouds around this previously mysterious database subject are being drawn back a bit. Playing around with sqlite3 from the command line to experiment reminds me of using irb to learn Ruby.

The switching between left and right brain activity is described thoroughly in Pragmatic Thinking and Learning. This applies well to learning a new API or programming language. You get coding a good example (context-rich environment) and read the code and experiment with it. Then you read through some documentation sources about what each part does--the analysis part. You apply this knowledge in context by experimenting a little further in your sandbox code. In turn, by swapping back and forth between your right and left brains, you develop intuition and learn much faster and learn more in-depth.

The discovery of new features is done in the analysis and how they work is done through experimentation. This gives rise to the "code it to figure out how it works" philosophy, which I've used to learn some of the weird nuances of C++.

Friday, February 20, 2009

Color Wheel Demo


This video was captured using xvidcap on my Linux box. It demonstrates the functionality of the color wheel demo in QtRuby. Colors are added by clicking in the center of the ring, and removed by clicking elsewhere. The color selecting tool is a standard widget provided by QColorDialog, which I've mentioned before.

This is my first screencast and it shows the programs functions nicely (though kinda fast), so I might be doing more of this in the future.

Thursday, February 12, 2009


I finished the iPhone tutorial for the second time yesterday. I completed it as the first thing that I wanted to do, just to learn how to get code setup on the iPod touch, and then went to reading documentation. After doing a lot of reading, going back and doing the first tutorial again helped significantly. The first run was making sure I could get the example working, while the second immersion was to explore the different concepts more in-depth. Reading the Objective-C language documentation last night clarified many of the language concepts from the tutorial.

Context helps language learning significantly, especially if you do immerse yourself if the language and don't worry about exactly what it is doing. The important issue is that you understand the general concepts of what is going on. Just as is everyday human languages, you may not be able to represent the same concept using a one-to-one correspondence of smaller components. There may be some building blocks (cases of words, loop structures, etc.) which don't exist in the other language.

Reading the language and actually working to produce a step-by-step example provide a quick method to develop your intuition about the language. Proceeding without any preconceptions of how things are done is what allows children to develop language skills quickly. Thinking in the other language, rather than translating, provides the additional benefit of allowing you to develop new patterns of thinking that are orthogonal to how you do things currently, since it hides your normal way of doing things.

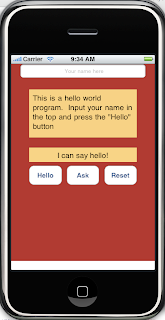
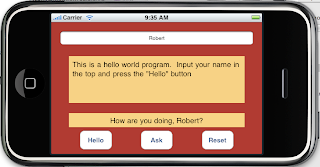
The second time I did the iPhone/iPod touch example, I added additional functionality on top of that provided in the tutorial. I added a button to change the label text to "How are you doing, [name]?" instead of just the provided "Hello, [name]." Also, I added a button to reset the name to placeholder text, and the label to the starting text, "I can say hello!". This predefined environment allows for exploration and play than starting from scratch. "I broke it by doing this, so I'll revert my changes and try something else." The Agile concept of always having a running demo helps us learn languages more quickly and more thoroughly through experimentation.

As seen in the images here, I added an uneditable text view showing the purpose of the program. Also, the "Reset", and "Ask" buttons are new from the tutorial, as is the support for horizontal, "landscape", mode was added. Not an award winning program, but I am proud of being able to extend the functionality of the original program and add some features I wanted. The learning experience was invaluable, but it is still only an initial step toward developing iPhone/iPod Touch applications.

Tuesday, February 10, 2009

iPod Touch/ iPhone Rotation

Rotation code for iPod Touch/iPhone. This is more of a thing you need to know that it exists, because it simply requires a few lines of code. This gets added to your UIViewController class which controls the View. Not very exciting except that it allows the program to be used in portrait or horizontal mode from any direction, even upside down. I still need to figure how to configure the view afterward, but at least the question of how it is done is answered. This is from the WhichWayIsUp app.

-(BOOL)shouldAutorotateToInterfaceOrientation:
(UIInterfaceOrientation)interfaceOrientation {
return YES;
}

Switching Development Methods... Again

By design or accident, I often find myself switching development environments (Microsoft Visual Studio to Eclipse to g++/make) or languages (Java to C++ to Ruby to Objective-C) when I start to get good at one of them. Originally, I began as a C++ programmer in high school, and then was moved over to Java with BlueJ in high school. I later moved to RealJ and then to JCreator LE during the course of school when I started developing using LWJGL. My freshman year in college, we moved to the "next great thing," Eclipse. Luckily, I managed to skip out on using BlueJ again. BlueJ had been a good beginner tool because it hid the unique details of how Java programs run, but it also keeps you in a very limited box.

Sophomore year, I was thrown back into C++ with templates in a data structures class. I got up to speed on C++ as fast as I could by doing a lot of examples, and playing around with as many language structures as I came across. Still, I remember the disbelief of another student who, late in the semester during a pair programming lab, didn't realize there was a delete keyword in C++, and that garbage collection didn't exist. So much for college teaching you the languages you need to learn.

My classes stayed in C++ until a Junior class in Operating Systems, were my classmates and I got to work on implementing features in the Pintos operating system. Did I mention none of us knew any real (pure) C? Of course, C is similar to C++, but there are those gotchas in many similar languages, such as void pointers. I did ok, K & R helped a whole lot, but I still don't feel attached to any language.

It was during the Operating System class that I quit using Windows entirely and switched to Debian Linux/Gnome. The change wasn't related to the class I was taking, but rather being genuinely disgruntled about paying for an operating system that crashed, was susceptible to viruses, and had an aura of a trash can which hasn't been emptied for several months.

Switching to Linux had to be the best thing I've done for my programming ability. I experimented with Bash scripts, and I started learning Perl during the summer by coding every example in the Llama book and pursuing my own projects. This was my first introduction to scripting languages.

Over the summer, my job had me writing in a variety of new languages, without any introduction. JavaScript, PHP, and Ruby rounded out the list, my formal experience before these assignments being merely that I had heard these languages existed. "Here's a book and a few good websites... go do this project," were my instructions, and I did as asked. They weren't critical projects to the team, but rather additional "it would be nice" projects that the team would never get to. This was also where I was introduced to QtRuby, and had a very hard time adapting to the duck-typing of Ruby.

It was at this company where I began my learning of the many in-depth features of Vim. Vim takes the concept of manipulating text and turns it into a super-ability. I've gotten better with it since, but the people I worked with moved like bolts of lightning in Vim.

I reverted back to Java last semester during my Graphics/GUI programming course. After all that C/C++ code, coding Java is about as simple as microwaving a frozen dinner. Combined with my Vim experience, my productivity grew several fold, and I finished the projects more quickly than I ever could have using another IDE. I returned to Swing development from way in high school, and JOGL... another Java binding for OpenGL, except designed for Swing, unlike LWJGL.

Over Christmas break, I applied my Qt knowledge to develop a bunch in Qt with C++ and work in OpenGL as well. I worked a lot in QtRuby, and the recent projects such as the color wheel have been as a result of this. I played with Python for a little while, and tried to decide whether to pursue it or Ruby, and ended up deciding on Ruby, since I kept writing Rubish Python.

Unfortunately, I've now moved over to iPhone development for a school project. This means using a Mac/XCode/Objective-C. This feels exactly like the "Here's some resources go do the job" from before, but by this time I'm getting used to it. Languages and development environments are starting to feel interchangeable. I don't have a lot of attachment to any language, except to Ruby because of a lot of the unique language constructs it offers over C++. I guess "real world" programming requires you to do whatever it takes to get the job done, but it also makes all languages emotionally neutral.

Part of me wishes for the old days of Java development where picking the language for the job was easy, because there was only one that you knew. However, another part wishes I knew more in-depth of each of the languages, and that I'm afraid of hurting myself through not knowing any language really well (though I am very proficient in Java, C++, and Ruby). Languages have become merely notations for doing something, pawns to get a computer to accomplish whatever you wish.

My journey is not yet complete. I want to explore more into Haskell (I played with Erlang a few months ago), Lisp, SQL, and Smalltalk to see more of the world of programming, but sort of want some language to call home.

Thursday, February 5, 2009

Radial Space Filling Tree


I've been continuing work with my color wheel using radial space filling trees, inspired in part because of DocBurst. I've modified the original source code to allow multiple levels of rings, though only three are seen here (the center circle is considered a segment, but I set it to the background color). Children sectors in the ring are constrained to the angle bounds of its parent.

Further steps include click detection on segments based to select different segments, and extracting a child segment to form a new color wheel.

Wednesday, February 4, 2009

Rings of Color


I've been thinking of making a color wheel for playing around with color palettes. This is an initial concept that I came up where sectors display colors. To actually get the ring effect I painted all of the colors as pies, and then filled the center of the circle containing the color pies with the background color.


Adding more colors creates more sections of the ring and the spacers prevent them from getting too close together. Future steps are to add a feature to generate shades of a color at given steps from a certain hue based upon saturation or brightness. Adding and saving of color palettes and exporting as Qt style sheets would also be useful.

Creating and editing colors is done using the already provided QColorDialog. Unfortunately, it doesn't provide as many options as the Java Swing Color Chooser, but it gets the job done for now.

Tuesday, February 3, 2009

Porting QT between C++ and Ruby

I have an assignment due next week for a graphics class I'm taking and I have given the ability to use whatever language or windowing libraries I want, provided they are portable. The only condition is that we are required to use OpenGL. Well, I wrote the project initially using C with GLUT, and then after realizing that my C code is really sketch, and ported it to a more familiar environment C++/Qt.

OpenGL with Qt is not really a much different animal than with GLUT, but it seems like OpenGL integrates better with the interface in Qt. I'd like to also try out OpenGL with FxRuby and WxWidgets to get a better idea of how to work with both traditional GUI interfaces while adding OpenGL effects to the mix. The OpenGL page for Ruby has a lot of helpful tips.

Tuesday, January 27, 2009

Write once, debug everywhere.

Java was initially heralded as the "Write once, run anywhere" language, and with its Swing GUI library this would end all programmers frustrations of porting code. Right? Of course this myth didn't last two long as there are a lot of undocumented hacks necessary to get our programs to play nicely on different systems. I remember one hack specifically from Game Programming in Java regarding an additional method call to the event queue to properly process events on Linux.

And of course I've run into this again on Windows with QtRuby. Something in several of my examples which use Qt::Timer (QTimer) for stepping simulations and repaints work fine on Linux, but not at all on Windows. Since I use Linux exclusively this isn't a critical issue right now, but I'm going to have to look into it if I plan to distribute any of my programs on Windows.

Friday, January 23, 2009

New Beginnings

Lately I've been working a lot of QtRuby. Linux development with it is quite quick, and and the desert color scheme of gvim makes things easy to read. I've already managed to use both a custom QWidget for 2D display and a QGLWidget using OpenGL together displaying information based upon the same model. Being able to use slots and signals is also helpful for breaking up your GUI into manageable and distinct parts.

There is a good translation of the Qt tutorials for Ruby, and explains many of the subtleties of how to do slots/signals in Ruby, and some other things which had been implemented as macros.

Getting QtRuby to run on Windows is a different story. The gem I tried was broken because of a buffer error in zlib, so I had to find a work around. This installation guide was very helpful and covers everything from installing Ruby to getting Qt, and getting the QtRuby bindings. Make sure you install mingw.exe as part of the Qt installation, and have qtruby4installer.exe pick the correct directory to find QtCore4.dll in (where you just installed Qt). Also, after you install Qt, you need to fire up a new console, or restart Explorer to get the new paths to load to find this .dll.